Have you ever tried to rename a course for your Garmin but couldn’t get it to work? In response to a question from a reader, here’s a simple way to do just that.
How to rename a course on your Garmin
You can approach this from two directions.
Firstly, the course may already exist on your Garmin, in which case you can simply try to edit the name from within the Courses menu. The number of characters is limited to 15.
To do this, go Menu > Courses > [click into the course you want] > Spanner > Name (the top option) > Then type a new name.
However, if you’ve created a course on your Garmin (say, from a route you previously completed), the chances are that you already named it something appropriate. So I’m guessing that in most cases, the kinds of courses you would want to rename would be new files you’ve downloaded from the internet. Things like GPX files from a sportive you’re about to ride, or a route your club mates created on Strava/RidewithGPS/Bikely for the Sunday club run.
Of particular interest here, and an issue mentioned by the reader in her question, is where you might have routes planned over several days. Any kind of touring of more than a few days requires good planning, and getting your routes all mixed up would mean lots of unnecessary time fiddling about with gizmos instead of pedalling.
A simple trick to edit the name of your GPX file.
Before we start, this process is covered in the video I made for this post (it’s the “extra tip” I refer to in the article).
The name of the file is NOT the name that will appear on your Garmin!
For example, if the actual file you download is called Filename.gpx, you won’t necessarily see a course called Filename when you load it up onto your Garmin.
Here’s why – the actual name that gets used is encoded inside the file, within the <name> tags. Sound scary? It honestly isn’t. You just need to open the file to edit it. Fortunately, this is a simple matter and you don’t need any special software to edit the GPX track.
If you’re interested in the techy side of things, go here for the official GPX schema, and some background info. As GPX is basically just a sort of XML file, it means we can edit it in something as simple as notepad.
Every Windows operating system has Notepad installed, I think. Mac users – you got something called TextEdit, apparently that does the same job, so Google tells me.
Here’s how to check if you’ve got Notepad on Windows 7. Don’t ask me about Windows 8. You bought Windows 8? (You poor thing!).
1. Hit the Start button
2. Start typing Notepad
3. You should see Notepad appear in the list, under “Programs” – great, you have Notepad!
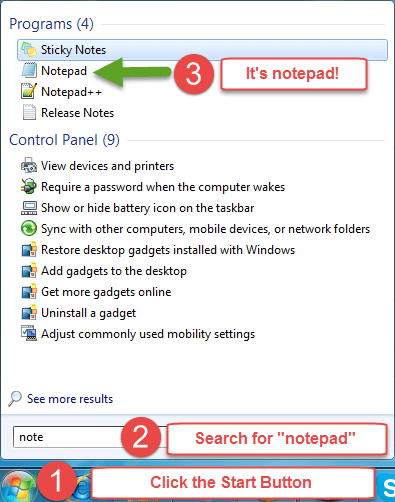
How to find Notepad on Windows 7
Notice that on my list, there’s another little program called Notepad++ pops up. This is a great little editor which takes Notepad, injects some digital testosterone and then tells it to MTFU. It’s also free. Get notepad++ here.
How to open the GPX file with Notepad to edit it.
I’m assuming that you have your prepared GPX file already sitting on your computer somewhere.
1. Right click the file, then
2. Choose Open
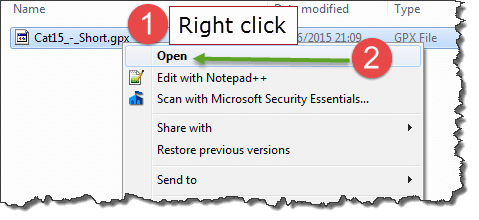
Right click the file name > choose Open
3. Choose the option to “Select a program from a list of installed programs”, and hit OK
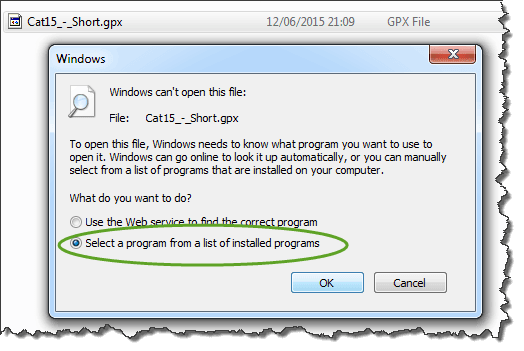
Choose “Select a program from a list of installed programs”
4. Hopefully you’ll see Notepad in the list, like this:
![]()
How and where to edit the GPX files with Notepad
When you first open the GPX file, the text might be all over the place, in which case it can help to turn on the “Word Wrap” feature.
Format > Word Wrap (tick it!)
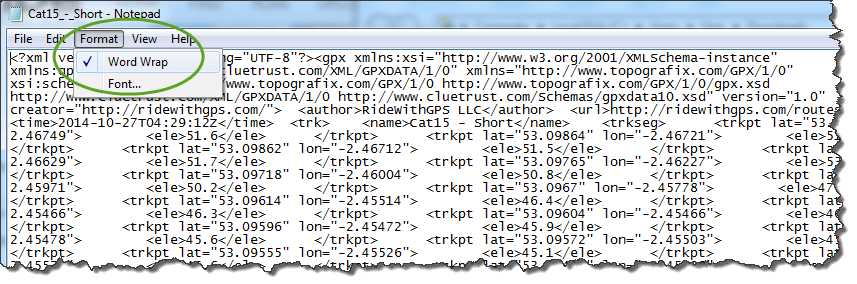
Turn on Word Wrap to make it a little easier.
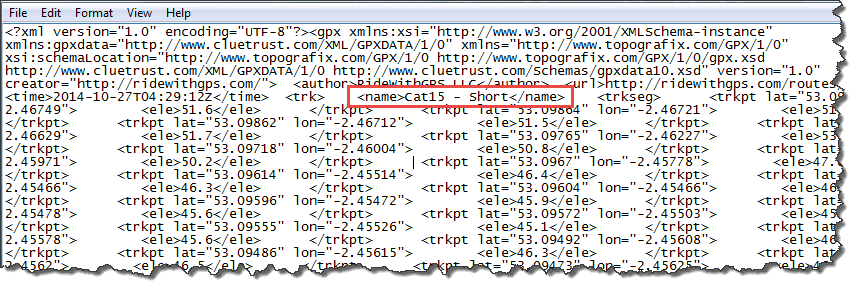
To change the name of the course as it will appear on your Garmin, you need to look for the text in between the <name> tags.
Whatever you type here will be how the course shows up on your course list in your Garmin menus. It is limited to 15 characters (on the Edge 800).
Save and close the file, then copy it over to your Garmin. This post explains where to put the GPX file.

Hope that helps!
U dont need all this…you can directly change the name in the watch by editing the course and going to name and entering a new name with the little alphanumeric entry screen they pop up when you select “name”