Hills are the marmite of cycling. Some love them, others will do anything to avoid them. Here’s a technique anyone can use to gain a psychological advantage when climbing hills, using a Garmin edge GPS.
I’ve known a few cyclists who fall into the “hill haters” camp. One thing they all seem to have in common is a sense of frustration that leads them to attack the climb too vigorously. Running out of steam way too early, they’re often forced to get off and push.
Less is more. Obviously the ability to find a sustainable pace is crucial, but to maximise an effort up a hill, it helps to know what’s ahead so you can pace yourself. On familiar climbs, this will be obvious, but what about an unfamiliar route, such as taking part in a sportive event out of your area, or even a local club ride which includes some sections you’re not too familiar with?
Here’s a great way to use your Garmin edge to help you up those hills.
You’ll need two things:
- A gpx file of the route you’ll be following
- The elevation screen needs to be enabled and set up appropriately.
To enable the elevation screen,
hit Menu > Spanner > Bike Settings > Training Pages > Elevation > [set to ON]
With your course loaded up, swipe across to the elevation screen. If you need a refresher on how to load a course, read my foolproof guide to course navigation on the garmin edge 800.
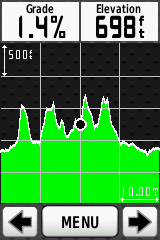
The elevation screen will look something like the image below. This was the first half of the Cheshire Cat 2013. Notice the scale. Each vertical unit is 500ft, and each horizontal unit is 10 miles. So that’s 40 miles worth of ride on one screen. The big dot in the middle is where you happen to be. At this scale, this chart isn’t going to be very useful.
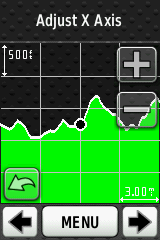
Tweak the axes
In the default view, the elevation profile may not be much use. We need to tweak it to be appropriate for the sort of route you’re doing.
The trick here is to adjust both the X and the Y axes to either stretch out or squash the graph so that you can see what’s ahead, and in a way that you can sense your progress along the curve, and relate that to the landscape in front of you.
First, hold your finger on the X-axis in the bottom right, where it displays how many miles are represented by one unit. The screen will change to allow you to edit this setting. Use the plus and minus keys to set it to about 0.5 miles, or 1 mile – whatever you prefer. Play around and see what feels best to you.
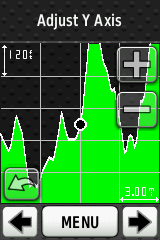
Do the same with the Y-axis to change the vertical elevation. This will depend on the terrain, but a setting of 120ft or 250ft per unit usually feels about right to me.
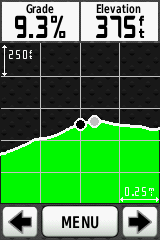
Insight is power.
Get this right, and you can accurately predict how intense, or how long the next section will be, when the rest is coming, how much of a downhill is coming up soon and so on.
Combine all this, and you’ll be pacing yourself more effectively, knowing when to hold back or give it more based on the knowledge of what lies ahead.
Sometimes hills can grind you down psychologically, and using this technique, you can see exactly when the rest is coming, and that can help motivate you to keep going.
Incidentally, if you’re riding against virtual partner data, one of your own past rides or maybe racing against someone else’s Strava KOM, you will see both yourself and the ghost’s position on the elevation chart. It’s probably not as useful as the proper VP screen which gives you the gap in seconds, but it’s worth mentioning.
Great article. I must admit i have not yet used this screen as everytime i have tried it all i get is a flat line with green underneath and was starting to wonder if it was of any use. If i can get it set up like this then i can see it being invaluable. Having just completed the Shropshire Hills sportive it would have been nice to know how far the top of Clee Hill was in order to push it a bit more.
Also, i race myself most days on my commute and having another visual which kind of mirrors Strava (actually there could be a fantastic idea there to integrate the newly intoduced live strava which marks where your segments are etc!) i can have a live comparison like you get on strava and get a good idea where my segments are. Definately getting the garmin ready for Monday with this now!
Thanks Garry, I’m glad you can see the potential. I certainly find it useful on routes I’m not familiar with.
Ha, same as Garry, That flat horizontal line wasn’t much of sense, I was frustrated during my recent ride there was a steep hill and even steeper bend where I couldn’t see further, So got discouraged in dismounted, Turned out just after that step bend, gradient gets to normal, I was so pissed off to dismount.
It’s finally where I decided to find there should be a way to see the ef!!!in gradient on the go, and your article came up, I’ll try to make use of that screen from now on! )) Many thanks!!
Alan, I am still having some problems using this screen. If I create a course on the garmin from a previous ride the profile screen seems to work just fine. However, creating a course on say Garmin Connect and then loading it to the device, the profile screen just displays a block of green with a straight line? Any ideas?
Experiment. Try a few different services and stick with one that works. http://Www.ridewithgps.com is very good ;-)
Elevation of courses created in Garmin Connect seems to be broken and Garmin don’t seem in a hurry to fix it
https://forums.garmin.com/showthread.php?36792-Course-elevation-profile-not-showing-after-course-is-created
I guess they’re making enough money already :-/
I emailed Garmin recently on that, suffice to say no response. I’ll try ridewithgps on Alan’s recommendation. The Garmin Connect glitch probably explains Garry’s question too.
Is it possible to save the x and y axis, so it uses these as th le defaults? Good article – thanks!!
On my “old” edge 800 I could use this feature. Is it correct I don’t have it on my new Edge 1000?
This is a very helpful article. Do you know if there is any way to save these dist and elevation scale settings on an Edge Touring? I seem to be able to make these changes in either of 2 places 1) after picking a course in the course inventory and viewing the elevation screen or by 2) viewing the elevation screen while navigating. But in both cases as soon as i change to a different screen view and change back to the elevation screen the scale settings are lost and it just goes back to the default scales. Any suggestions would be welcome.